
Search Developer's Guide — Chapter 26
Training the Classifier
MarkLogic Server includes an XML support vector machine (SVM) classifier. This chapter describes the classifier and how to use it on your content, and includes the following sections:
- Understanding How Training and Classification Works
- Classifier API
- Leveraging XML With the Classifier
- Creating a Training Set
- Methodology For Determining Thresholds For Each Class
- Example: Training and Running the Classifier
Understanding How Training and Classification Works
The classifier is a set of APIs that allow you to define classes, or categories of nodes. By running samples of classes through the classifier to train it on what constitutes a given class, you can then run that trained classifier on unknown documents or nodes to determine to which classes each belongs. The process of classification uses the full-text indexing capabilities of MarkLogic Server, as well as its XML-awareness, to perform statistical analysis of terms in the training content to determine class membership. This section describes the concepts behind the classifier and includes the following parts:
- Training and Classification
- XML SVM Classifier
- Hyper-Planes and Thresholds for Classes
- Training Content for the Classifier
Training and Classification
There are two basic steps to using the classifier: training and classification. Training is the process of taking content that is known to belong to specified classes and creating a classifier on the basis of that known content. Classification is the process of taking a classifier built with such a training content set and running it on unknown content to determine class membership for the unknown content. Training is an iterative process whereby you build the best classifier possible, and classification is a one-time process designed to run on unknown content.
XML SVM Classifier
The MarkLogic Server classifier implements a support vector machine (SVM). An SVM classifier uses a well-known algorithm to determine membership in a given class, based on training data. For background on the mathematics behind support vector machine (SVM) classifiers, try doing a web search for svm classifier, or start by looking at the information on Wikipedia.
The basic idea is that the classifier takes a set of training content representing known examples of classes and, by performing statistical analysis of the training content, uses the knowledge gleaned from the training content to decide to which classes other unknown content belongs. You can use the classifier to gain knowledge about your content based on the statistical analysis performed during training.
Traditional SVM classifiers perform the statistical analysis using term frequency as input to the support vector machine calculations. The MarkLogic XML SVM classifier takes advantage of MarkLogic Server's XML-aware full-text indexing capabilities, so the terms that act as input to the classifier can include content (for example, words), structure information (for example, elements), or a combination of content and structure (for example, element-word relationships). All of the MarkLogic Server index options that affect terms are available as options in the classifier API, so you can use a wide variety of indexing techniques to tune the classifier to work the best for your sample content.
First you define your classes on a set of training content, and then the classifier uses those classes to analyze other content and determine its classification. When the classifier analyzes the content, there are two sometimes conflicting measurements it uses to help determine if the information in the new content belongs in or out of a class:
- Precision: The probability that what is classified as being in a class is actually in that class. High precision might come at the expense of missing some results whose terms resemble those of other results in other classes.
- Recall: The probability that an item actually in a class is classified as being in that class. High recall might come at the expense of including results from other classes whose terms resemble those of results in the target class.
When you are tuning your classifier, you need to find a balance between high precision and high recall. That balance depends on what your application goals and requirements are. For example, if you are trying to find trends in your content, then high precision is probably more important; you want to ensure that your analysis does not include irrelevant nodes. If you need to identify every instance of some classification, however, you probably need a high recall, as missing any members would go against your application goals. For most applications, you probably need somewhere in between. The process of training your classifier is where you determine the optimal values (based on your training content set) to make the trade-offs that make sense to your application.
Hyper-Planes and Thresholds for Classes
There are two main things that the computations behind the XML SVM classifier do:
- Determine the boundaries between each class. This is done during training.
- Determine the threshold for which the boundaries return the most distinctive results when determining class membership.
There can be any number of classes. A term vector is a representation of all of the terms (as defined by the index options) in a node. Therefore, classes consist of sets of term vectors which have been deemed similar enough to belong to the same class.
Imagine for a moment that each term forms a dimension. It is easy to visualize what a 2-dimensional picture of a class looks like (imagine an x-y graph) or even a 3-dimensional picture (imagine a room with height, width, and length). It becomes difficult, however, to visualize what the picture of these dimensions looks like when there are more than three dimensions. That is where hyper-planes become a useful concept.
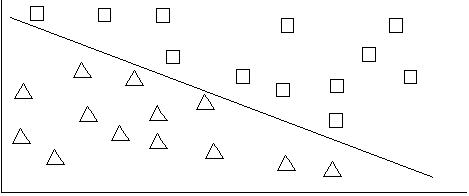
Before going deeper into the concept of hyper-planes, consider a content set with two classes, one that are squares and one that are triangles. In the following figures, each square or triangle represents a term vector that is a member of either the square or triangle class, respectively.

Now try to draw a line to separate the triangles from the squares. In this case, you can draw such a line that nicely divides the two classes as follows:
If this were three dimensions, instead of a line between the classes it would be a plane between the classes. When the number of dimensions grows beyond three, the extension of the plane is called a hyper-plane; it is the generalized representation of a boundary of a class (sometimes called the edge of a class).
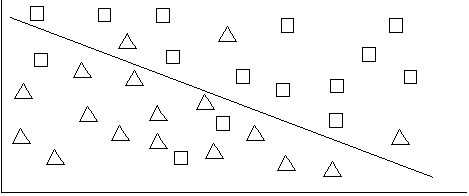
The previous examples are somewhat simplified; they are set up such that the hyper-planes can be drawn such that one class is completely on one side and the other is completely on the other. For most real-world content, there are members of each class on the other side of the boundaries as follows:
In these cases, you can draw other lines parallel to the boundaries (or in the n-dimensional cases, other hyper-planes). These other lines represent the thresholds for the classes. The distance between the boundary line and the threshold line represents the threshold value, which is a negative number indicating how far the outlier members of the class are from the class boundary. The following figure represents these thresholds.
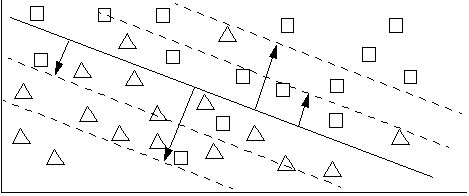
The dotted lines represent some possible thresholds. The lines closer to the boundary represent thresholds with higher precision (but not complete precision), while the lines farther from the boundaries represent higher recall. For members of the triangle class that are on the other side of the square class boundaries, those members are not in the class, but if they are within the threshold you choose, then they are considered part of the class.
One of the classifier APIs (cts:thresholds) helps you find the right thresholds for your training content set so you can get the right balance between precision and recall when you run unknown content against the classifier to determin class membership.
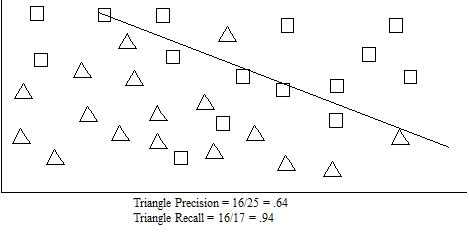
The following figure shows the triangle class boundary, including the precision and recall calculations based on a threshold (the triangle class is below the threshold line):
Training Content for the Classifier
To find the best thresholds for your content, you need to train the classifier with sample content that represents members of all of the classes. It is very important to find good training samples, as the quality of the training will directly impact the quality of your classification.
The samples for each class should be statistically relevant, and should have samples that include both solid examples of the class (that is, samples that fall well into the positive side of the threshold from the class boundary) and samples that are close to the boundary for the class. The samples close to the boundary are very important, because they help determine the best thresholds for your content. For more details about training sets and setting the threshold, see Creating a Training Set and Methodology For Determining Thresholds For Each Class.
Classifier API
The classifier has three XQuery built-in functions. This section gives an overview and explains some of the features of the API, and includes the following parts:
- XQuery Built-In Functions
- Data Can Reside Anywhere or Be Constructed
- API is Extremely Tunable
- Supports Versus Weights Classifiers
- Kernels (Mapping Functions)
- Find Thresholds That Balance Precision and Recall
For details about the syntax and usage of the classifier API, see the MarkLogic XQuery and XSLT Function Reference.
XQuery Built-In Functions
The classifier API includes three XQuery functions:
You use these functions to take training nodes use them to compute classifiers. Creating a classifier specification is an iterative process whereby you create training content, train the classifier (using cts:train) with the training content, test your classifier on some other training content (using cts:classify), compute the thresholds on the training content (using cts:threshold), and repeat this process until you are satisfied with the results. For details about the syntax and usage of the classifier API, see the MarkLogic XQuery and XSLT Function Reference.
Data Can Reside Anywhere or Be Constructed
The classifier APIs take nodes and elements, so you can either use XQuery to construct the data for the nodes you are classifying or training, or you can store them in the database (or somewhere else), whichever is more convenient. Because the APIs take nodes as parameters, there is a lot of flexibility in how you store your training and classification data.
There is an exception to this: if you are using the supports form of the classifier, then the training data must reside in the database, and you must pass in the training nodes when you perform classification (that is, when you run cts:classify) on unknown content.
API is Extremely Tunable
The classifier API has many options, and is therefore extremely tunable. You can choose the different index options and kernel types for cts:train, as well as specify limits and thresholds. When you change the kernel type for cts:train, it will effect the results you get from classification, as well as effect the performance. Because classification is an iterative process, experimentation with your own content set tends to help get better results from the classifier. You might change some parameters during different iterations and see which gives the better classification for your content.
The following section describes the differences between the supports and weights forms of the classifier. For details on what each option of the classifier does, see the MarkLogic XQuery and XSLT Function Reference.
Supports Versus Weights Classifiers
There are two forms of the classifier:
supports: allows the use of some of the more sophisticated kernels. It encodes the classifier by reference to specific documents in the training set, and is therefore more accurate because the whole training document can be used for classification; however, that means that the whole training set must be available during classification, and it must be stored in the database. Furthermore, since constructing a term vector is exactly equivalent to indexing, each time the classifier is invoked it regenerates the index terms for the whole training set. On the other hand, the actual representation of the classifier (the XML returned from cts:train) may be a lot more compact. The other advantage of thesupportsform of the classifier is that it can give you error estimates for specific training documents, which may be a sign that those are misclassified or that other parameters are not set to optimal values.weights: encodes weights for each of the terms. For mathematical reasons, it cannot be used with the Gaussian or Geodesic kernels, although for many problems, those kernels give the best results. Since there will not be a weight for every term in training set (because of term compression), this form of the classifier is intrinsically less precise. If there are a lot of classes and a lot of terms, the classifier representation itself can get quite large. However, there is no need to have the training set on hand during classification, nor to construct term vectors from it (in essence to regenerate the index terms), so cts:classify runs much faster with theweightsform of the classifier.
Which one you choose depends on your answers to several questions and criteria, such as performance (does the supports form take too much time and resources for your data?), accuracy (are you happy with the results you get with the weights form with your data?), and other factors you might encounter while experimenting with the different forms. In general, the classifier is extremely tunable, and getting the best results for your data will be an iterative process, both on what you use for training data and what options you use in your classification.
Kernels (Mapping Functions)
You can choose different kernels during the training phase. The kernels are mapping functions, and they are used to determine the distance of a term vector from the edge of the class. For a description of each of the kernel mapping functions, see the documentation for cts:train in the MarkLogic XQuery and XSLT Function Reference.
Find Thresholds That Balance Precision and Recall
As part of the iterative nature of training to create a classifier specification, one of the overriding goals is to find the best threshold values for your classes and your content set. Ideally, you want to find thresholds that strike a balance between good precision and good recall (for details on precision and recall, see XML SVM Classifier). You use the cts:thresholds function to calculate the thresholds based on a training set. For an overview of the iterative process of finding the right thresholds, see Methodology For Determining Thresholds For Each Class.
Leveraging XML With the Classifier
Because the classifier operates from an XQuery context, and because it is built into MarkLogic Server, it is intrinsically XML-aware. This has many advantages. You can choose to classify based on a particular element or element hierarchy (or even a more complicated XML construct), and then use that classifier against either other like elements or element hierarchies, or even against a totally different set of element or element hierarchies. You can perform XML-based searches to find the best training data. If you have built XML structure into your content, you can leverage that structure with the classifier.
For example, if you have a set of articles that you want to classify, you can classify against only the <executive-summary> section of the articles, which can help to exclude references to other content sections, and which might have a more universal style and language than the more detailed sections of the articles. This approach might result in using terms that are highly relevant to the topic of each article for determining class membership.
Creating a Training Set
This section describes the training content set you use to create a classifier, and includes the following parts:
Importance of the Training Set
The quality of your classification can only be as good as the training set you use to run the classifier. It is extremely important to choose sample training nodes that not only represent obvious examples of a class, but also samples which represent edge cases that belong in or out of a class.
Because the process of classification is about determining the edges of the classes, having good samples that are close to this edge is important. You cannot always determine what constitutes an edge sample, though, by examining the training sample. It is therefore good practice to get as many different kinds of samples in the training set as possible.
As part of the process of training the classifier, you might need to add more samples, verify that the samples are actually good samples, or even take some samples away (if they turn out to be poor samples) from some classes. Also, you can specify negative samples for a class. It is an iterative process of finding the right training data and setting the various training options until you end up with a classifier that works well for your data.
Defining Labels for the Training Set
The second parameter to cts:train is a label specification, which is a sequence of cts:label elements, each one having a one cts:class child. Each cts:label element represents a node in the training set. The cts:label elements must be in the order corresponding to the specified training nodes, and they each specify to which class the corresponding training node belongs. For example, the following cts:label nodes specifies that the first training node is in the class comedy, the second in the class tragedy, and the third in the class history:
<cts:label>
  <cts:class name="comedy"/>
</cts:label>
<cts:label>
  <cts:class name="tragedy"/>
</cts:label>
<cts:label>
  <cts:class name="history"/>
</cts:label>
Because the labels must be in the order corresponding to the training nodes, you might find it convenient to generate the labels from the training nodes. For example, the following code extracts the class name for the labels from a property names playtype stored in the property corresponding to the training nodes:
for $play in xdmp:directory("/plays/", "1")
return
  <cts:label>
  <cts:class name="{
    xdmp:document-property(xdmp:node-uri($play))//playtype/text()}"/>
  </cts:label>
If you have training samples that represent negative samples for a class (that is, they are examples of what does not belong in the class), you can label them such by specifying the val="-1" attribute on the cts:class element as follows:
<cts:class name="comedy" val="-1"/>
Additionally, you can include multiple classes in a label (because membership in one class is independent of membership in another). For example:
<cts:label>
  <cts:class name="comedy" val="-1"/>
  <cts:class name="tragedy"/>
  <cts:class name="history"/>
</cts:label>
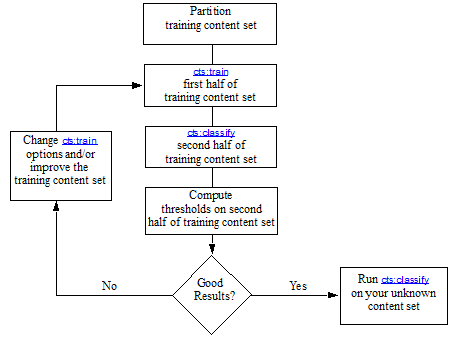
Methodology For Determining Thresholds For Each Class
Use the following methodology to determine appropriate per-class thresholds for classification:
- Partition the training set into two parts. Ideally, the partitions should be statistically equal. One way to achieve this is to randomize which nodes go into one partition and which go into the other.
- Run cts:train on the first half of the training set.
- Run cts:classify on the second half of the training set with the output of cts:train from the first half in the previous step. This is to validate that the training data you used produced good classification. Use the default value for the
thresholdsoption for this run. The default value is a very large negative number, so this run will measure the distance from the actual class boundary for each node in the training set. - Run cts:thresholds to compute thresholds for the second half of the training set. This will further validate your training data and the parameters you set when running cts:train on your training data.
- Iterate through the previous steps until you are satisfied with the results from your training content (that is, you until you are satisfied with the classifier you create). You might need to experiment with the various option settings for cts:train (for example, different kernels, different index settings, and so on) until you get the classification you desire.
- After you are satisfied that you are getting good results, run cts:classify on the unknown documents, using the computed thresholds (the values from cts:thresholds) as the boundaries for deciding on class membership.
Any time you pass thresholds to cts:train, the thresholds apply to cts:classify. You can pass them either with cts:train or cts:classify, though, and the effect is the same.
Example: Training and Running the Classifier
This section describes the steps needed to train the classifier against a content set of the plays of William Shakespeare. This is meant is a simple example for illustrating how to use the classifier, not necessarily as an example of the best results you can get out of the classifier. The steps are divided into the following parts:
- Shakespeare's Plays: The Training Set
- Comedy, Tragedy, History: The Classes
- Partition the Training Content Set
- Create Labels on the First Half of the Training Content
- Run cts:train on the First Half of the Training Content
- Run cts:classify on the Second Half of the Content Set
- Use cts:thresholds to Compute the Thresholds on the Second Half
- Evaluating Your Results, Make Changes, and Run Another Iteration
- Run the Classifier on Other Content
Shakespeare's Plays: The Training Set
When you are creating a classifier, the first step is to choose some training content. In this example, we will use the plays of William Shakespeare as the training set from which to create a classifier.
The Shakespeare plays are available in XML at the following URL (subject to the copyright restrictions stated in the plays):
http://www.oasis-open.org/cover/bosakShakespeare200.html
This example assumes the plays are loaded into a MarkLogic Server database under the directory /shakespeare/plays/. There are 37 plays.
Comedy, Tragedy, History: The Classes
After deciding on the training set, the next step is to choose classes in which you divide the set, as well as choosing labels for those classes. For Shakespeare, the classes are COMEDY, TRAGEDY, and HISTORY. You must decide which plays belong to each class. To determine which Shakespeare plays are comedies, tragedies, and histories, consult your favorite Shakespeare scholars (there is reasonable, but not complete agreement about which plays belong in which classes).
For convenience, we will store the classes in the properties document at each play URI. To create the properties for each document, perform something similar to the following for each play (inserting the appropriate class as the property value):
xdmp:document-set-properties("/shakespeare/plays/hamlet.xml",
      <playtype>TRAGEDY</playtype>)
For details on properties in MarkLogic Server, see Properties Documents and Directories in the Application Developer's Guide.
Partition the Training Content Set
Next, we will divide the training set into two parts, where we know the class of each node in both parts. We will use the first part to train and the second part to validate the classifier built from the first half of the training set. The two parts should be statistically random, and to do that we will simply take the first half in the order that the documents return from the xdmp:directory call. You can choose a more sophisticated randomization technique if you like.
Create Labels on the First Half of the Training Content
As we are taking the first half of the play for the training content, we will need labels for each node (in this example, we are using the document node for each play as the training nodes). To create the labels on the first half of the content, run a query statement similar to the following:
for $x in xdmp:directory("/shakespeare/plays/", "1")[1 to 19]
return
<cts:label>
  <cts:class name="{xdmp:document-properties(xdmp:node-uri($x))
       //playtype/text()}"/>
</cts:label>
For simplicity, this example uses the first 19 items of the content set as the training nodes. The samples you use should use a statistically random sample of the content for the training set, so you might want to use a slightly more complicated method (that is, one that ensures randomness) for choosing the training set.
Run cts:train on the First Half of the Training Content
Next, you run cts:train with your training content and labels. The following code constructs the labels and runs cts:train to generate a classifier specification:
let $firsthalf := xdmp:directory("/shakespeare/plays/", "1")[1 to 19]
let $labels := for $x in $firsthalf
       return
       <cts:label>
         <cts:class name="{xdmp:document-properties(xdmp:node-uri($x))
                //playtype/text()}"/>
       </cts:label>
return
cts:train($firsthalf, $labels,
       <options xmlns="cts:train">
         <classifier-type>supports</classifier-type>
       </options>)
You can either save the generated classifier specification in a document in the database or run this code dynamically in the next step.
Run cts:classify on the Second Half of the Content Set
Next, you take the classifier specification created with the first half of the training set and run cts:classify on the second half of the content set, as follows:
let $firsthalf := xdmp:directory("/shakespeare/plays/", "1")[1 to 19]
let $secondhalf := xdmp:directory("/shakespeare/plays/", "1")[20 to 37]
let $classifier :=
  let $labels := for $x in $firsthalf
    return
      <cts:label>
        <cts:class name="{xdmp:document-properties(xdmp:node-uri($x))
            //@name}"/>
      </cts:label>
  return
  cts:train($firsthalf, $labels,
      <options xmlns="cts:train">
        <classifier-type>supports</classifier-type>
      </options>)
return
cts:classify($secondhalf, $classifier,
      <options xmlns="cts:classify"/>,
      $firsthalf)
Use cts:thresholds to Compute the Thresholds on the Second Half
Next, calculate cts:label elements for the second half of the content and use it to compute the thresholds to use with the classifier. The following code runs cts:train and cts:classify again for clarity, although the output of each could be stored in a document.
let $firsthalf := xdmp:directory("/shakespeare/plays/", "1")[1 to 19]
let $secondhalf := xdmp:directory("/shakespeare/plays/", "1")[20 to 37]
let $firstlabels := for $x in $firsthalf
        return
        <cts:label>
          <cts:class name="{xdmp:document-properties(xdmp:node-uri($x))
                                     //playtype/text()}"/>
        </cts:label>
let $secondlabels := for $x in $secondhalf
        return
        <cts:label>
          <cts:class name="{xdmp:document-properties(xdmp:node-uri($x))
                                     //playtype/text()}"/>
        </cts:label>
let $classifier :=
    cts:train($firsthalf, $firstlabels,
      <options xmlns="cts:train">
        <classifier-type>supports</classifier-type>
      </options>)
let $classifysecond :=
  cts:classify($secondhalf, $classifier,
        <options xmlns="cts:classify"/>,
        $firsthalf)
return
cts:thresholds($classifysecond, $secondlabels)
This produces output similar to the following:
<thresholds xmlns="http://marklogic.com/cts">
  <class name="TRAGEDY" threshold="-0.00215207" precision="1"
         recall="0.666667" f="0.8" count="3"/>
  <class name="COMEDY" threshold="0.216902" precision="0.916667"
         recall="1" f="0.956522" count="11"/>
  <class name="HISTORY" threshold="0.567648" precision="1"
         recall="1" f="1" count="4"/>
</thresholds>
Evaluating Your Results, Make Changes, and Run Another Iteration
Finally, you can analyze the results from cts:thresholds. As an ideal, the thresholds should be zero. In practice, a negative number relatively close to zero makes a good threshold. The threshold for tragedy above is quite good, but the thresholds for the other classes are not quite as good. If you want the thresholds to be better, you can try running everything again with different parameters for the kernel, for the indexing options, and so on. Also, you can change your training data (to try and find better examples of comedy, for example).
Run the Classifier on Other Content
Once you are satisfied with your classifier, you can run it on other content. For example, you can try running it on SPEECH elements in the shakespeare plays, or try it on plays by other playwrights.